Table of Contents
On Learning Japanese
In addition to this guide, you may also found the two video tutorials helpful. They cover the Kanji card, and the physical spaced repetition system:
Learning Japanese is a daunting task. That’s why having good resources is critical.
The study of Japanese, or languages in general, is quite personal. Be it writing, speaking, listening, vocabulary, or grammar, the paths trodden on the way to fluency are wide and varied. That said, learning the Japanese Kanji characters is essentially unavoidable.
Kanji characters are an important foundation of Japanese: both for being historical roots of the language and because they are pervasively used in Japanese (e.g. to form nouns, verbs, adjectives, etc.). And, of course, having a solid foundation – knowing Kanji – enables learners to improve faster and with more confidence down the road!
Kanjideck is our deck of cards for learning Japanese. It’s designed with kanji as the root of each card. Each kanji is understood through its readings, etymology, compound examples, and certain verbs/adjectives – pieces which form branches and leaves reaching out from the kanji into the rest of the metaphorical Japanese language tree. Beyond kanji cards, Kanjideck includes cards to form a physical spaced repetition system and hiragana, katakana, and verb-adjective-conjugation reference cards.
Studying each card means, foundationally, to learn the kanji in that card, but it also means to practice these many aspects of Japanese required to contextualize the kanji while improving your fluency overall.

Conversely, it is not a goal of Kanjideck to be the sole resource used in the study of Japanese, but rather be very good at the parts it does serve. For instance, complementary study should include listening and reading full sentences.
This guide covers how to use Kanjideck to study Japanese, from the detailed anatomy of a card to the built-in spaced repetition system, starting with some background information on the Japanese language. For further reading on the path to learning Japanese, we recommend the very good Learn Japanese: A Ridiculously Detailed Guide by Tofugu.
Writing Systems
Unlike the majority of languages, Japanese has not one, but three writing systems! All three of which are used in conjunction and mixed with one another in everyday Japanese. There is no way around them, but, fortunately, only one of them is hard. They are:
- Hiragana (ひらがな)
- Katakana (カタカナ)
- Kanji (漢字)
Hiragana and Katakana are both phonetic scripts, a set of symbols with each simply corresponding to a syllable (or, more accurately, a mora). For instance, both the hiragana symbol 「あ」 and katakana symbol 「ア」 are pronounced/correspond to the syllable /a/ (read a). There exist 46 hiragana symbols and 48 katakana symbols, roughly corresponding to the same syllables/sounds. Most can be augmented with marks such as 「゛」 which modify some of its sound, but the symbol remains the same.
In contrast, Kanji is a logographic script largely adapted/imported from the Chinese script. Every kanji symbol represents a semantic component of the language and has one or more readings, which determine how the kanji is pronounced. If you are curious, you can read more about the history of these readings, and why there may be many, in On’yomi and Kun’yomi in Kanji: What’s the Difference?.
An example sentence using all three scripts is 「この色は、何色ですか?」, with kanji in bold.
Out of the three, Hiragana and Katakana can be learned considerably fast (depending on your pace) – say, a week or two. Kanji is by far hardest, taking at least many months to learn all the 2136 kanji characters needed for fluency (the Jōyō Kanji). For measure, if one were to consistently learn 5 new kanji every day, it would roughly take 14 months to learn them all. This may sound like a lot of new kanji every single day, but it is actually a sensible amount when a spaced repetition system is considered – the same type of system that Kanjideck uses.
Kanjideck’s focus is learning Kanji. Knowing Hiragana and Katakana is recommended, but not strictly necessary, to use our cards/learn Kanji. The good news is both are easy and you can start learning Hiragana right now, while waiting for your copy of Kanjideck to arrive (extra motivation!). You can also consult the Hiragana and Katakana reference cards included in the deck to learn each kanji’s readings as you go, while establishing your knowledge of Hiragana and Katakana – but getting started with these phonetic symbols before hand should prove much easier.
How to use Kanjideck
Kanjideck is available both physically and virtually (as an Anki deck), but the cards are studied with the same principles regardless of the medium, as explained below.
We recommend studying Japanese with Kanjideck by following this simple formula:
- Review cards you’ve already learned, according to the schedule,
- And learn a couple of new cards (3-5),
- Every day.
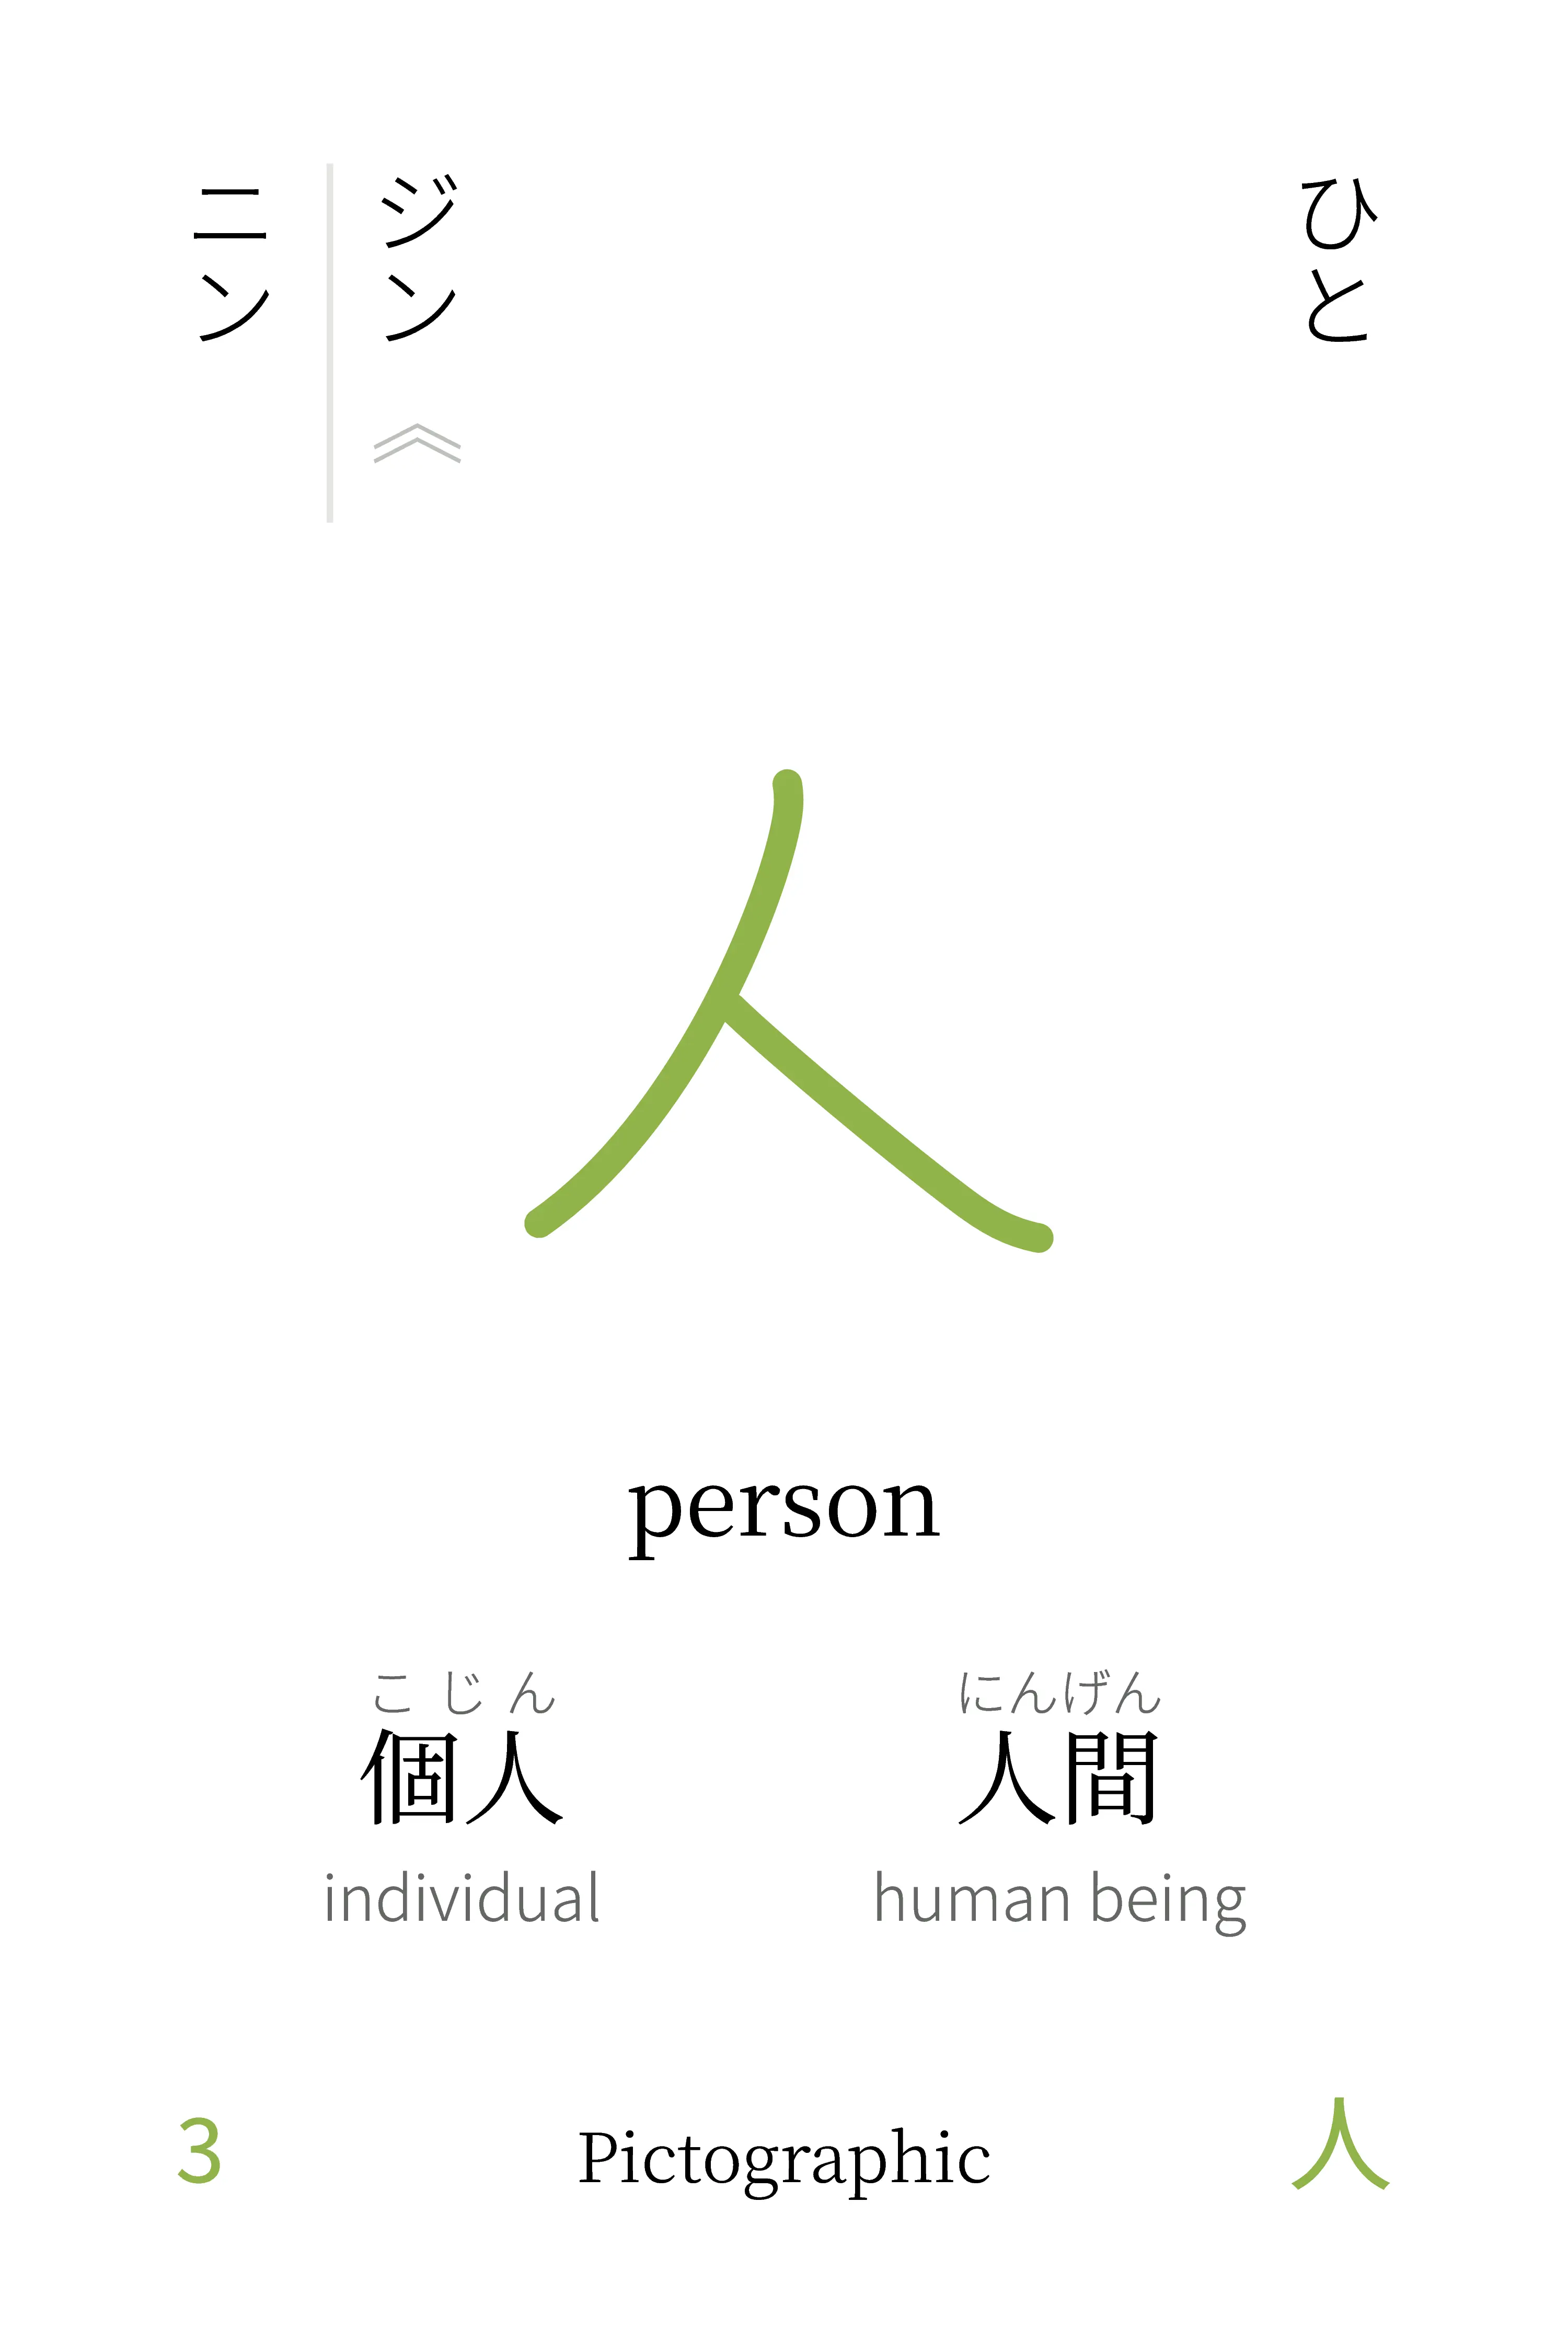
To review a card, pick it up with the colored side facing towards you and try to actively recall, from the Kanji in the center, its meanings and at least one of its readings. For example, for the 「人」 character:

A successful review means you recalled that the Kanji 「人」 means “person” and can be read as 「じん」 (/jeen/). Or, perhaps, you remembered its 「ひと」 (/heetoh/) reading instead, and that’s also great. If you didn’t remember at least both one reading and one meaning, then it wasn’t a successful review (unless your goal is, e.g., to understand the meanings only). Turn around the card to check!
Take the time to passively review the examples and other readings of every Kanji by going through them and practicing them out loud after having turned the card, especially for Kanji which you find harder.
Learning a card starts similarly, except that instead of trying to recall the meanings and readings from the back, you’re just analyzing the character and its components from the back before turning it around to study the Kanji in more detail.
Studying a Kanji card
When reviewing or learning a card, you’ll be looking at the side of the card with all this information related to the Kanji. How do you use it in your Kanjideck study and Kanji-learning-journey? Refer to the image describing the card components (as seen above) to visualise the terminology in bold. What follows is a step-by-step analysis of the learning components in a Kanjideck card. The example we use is:
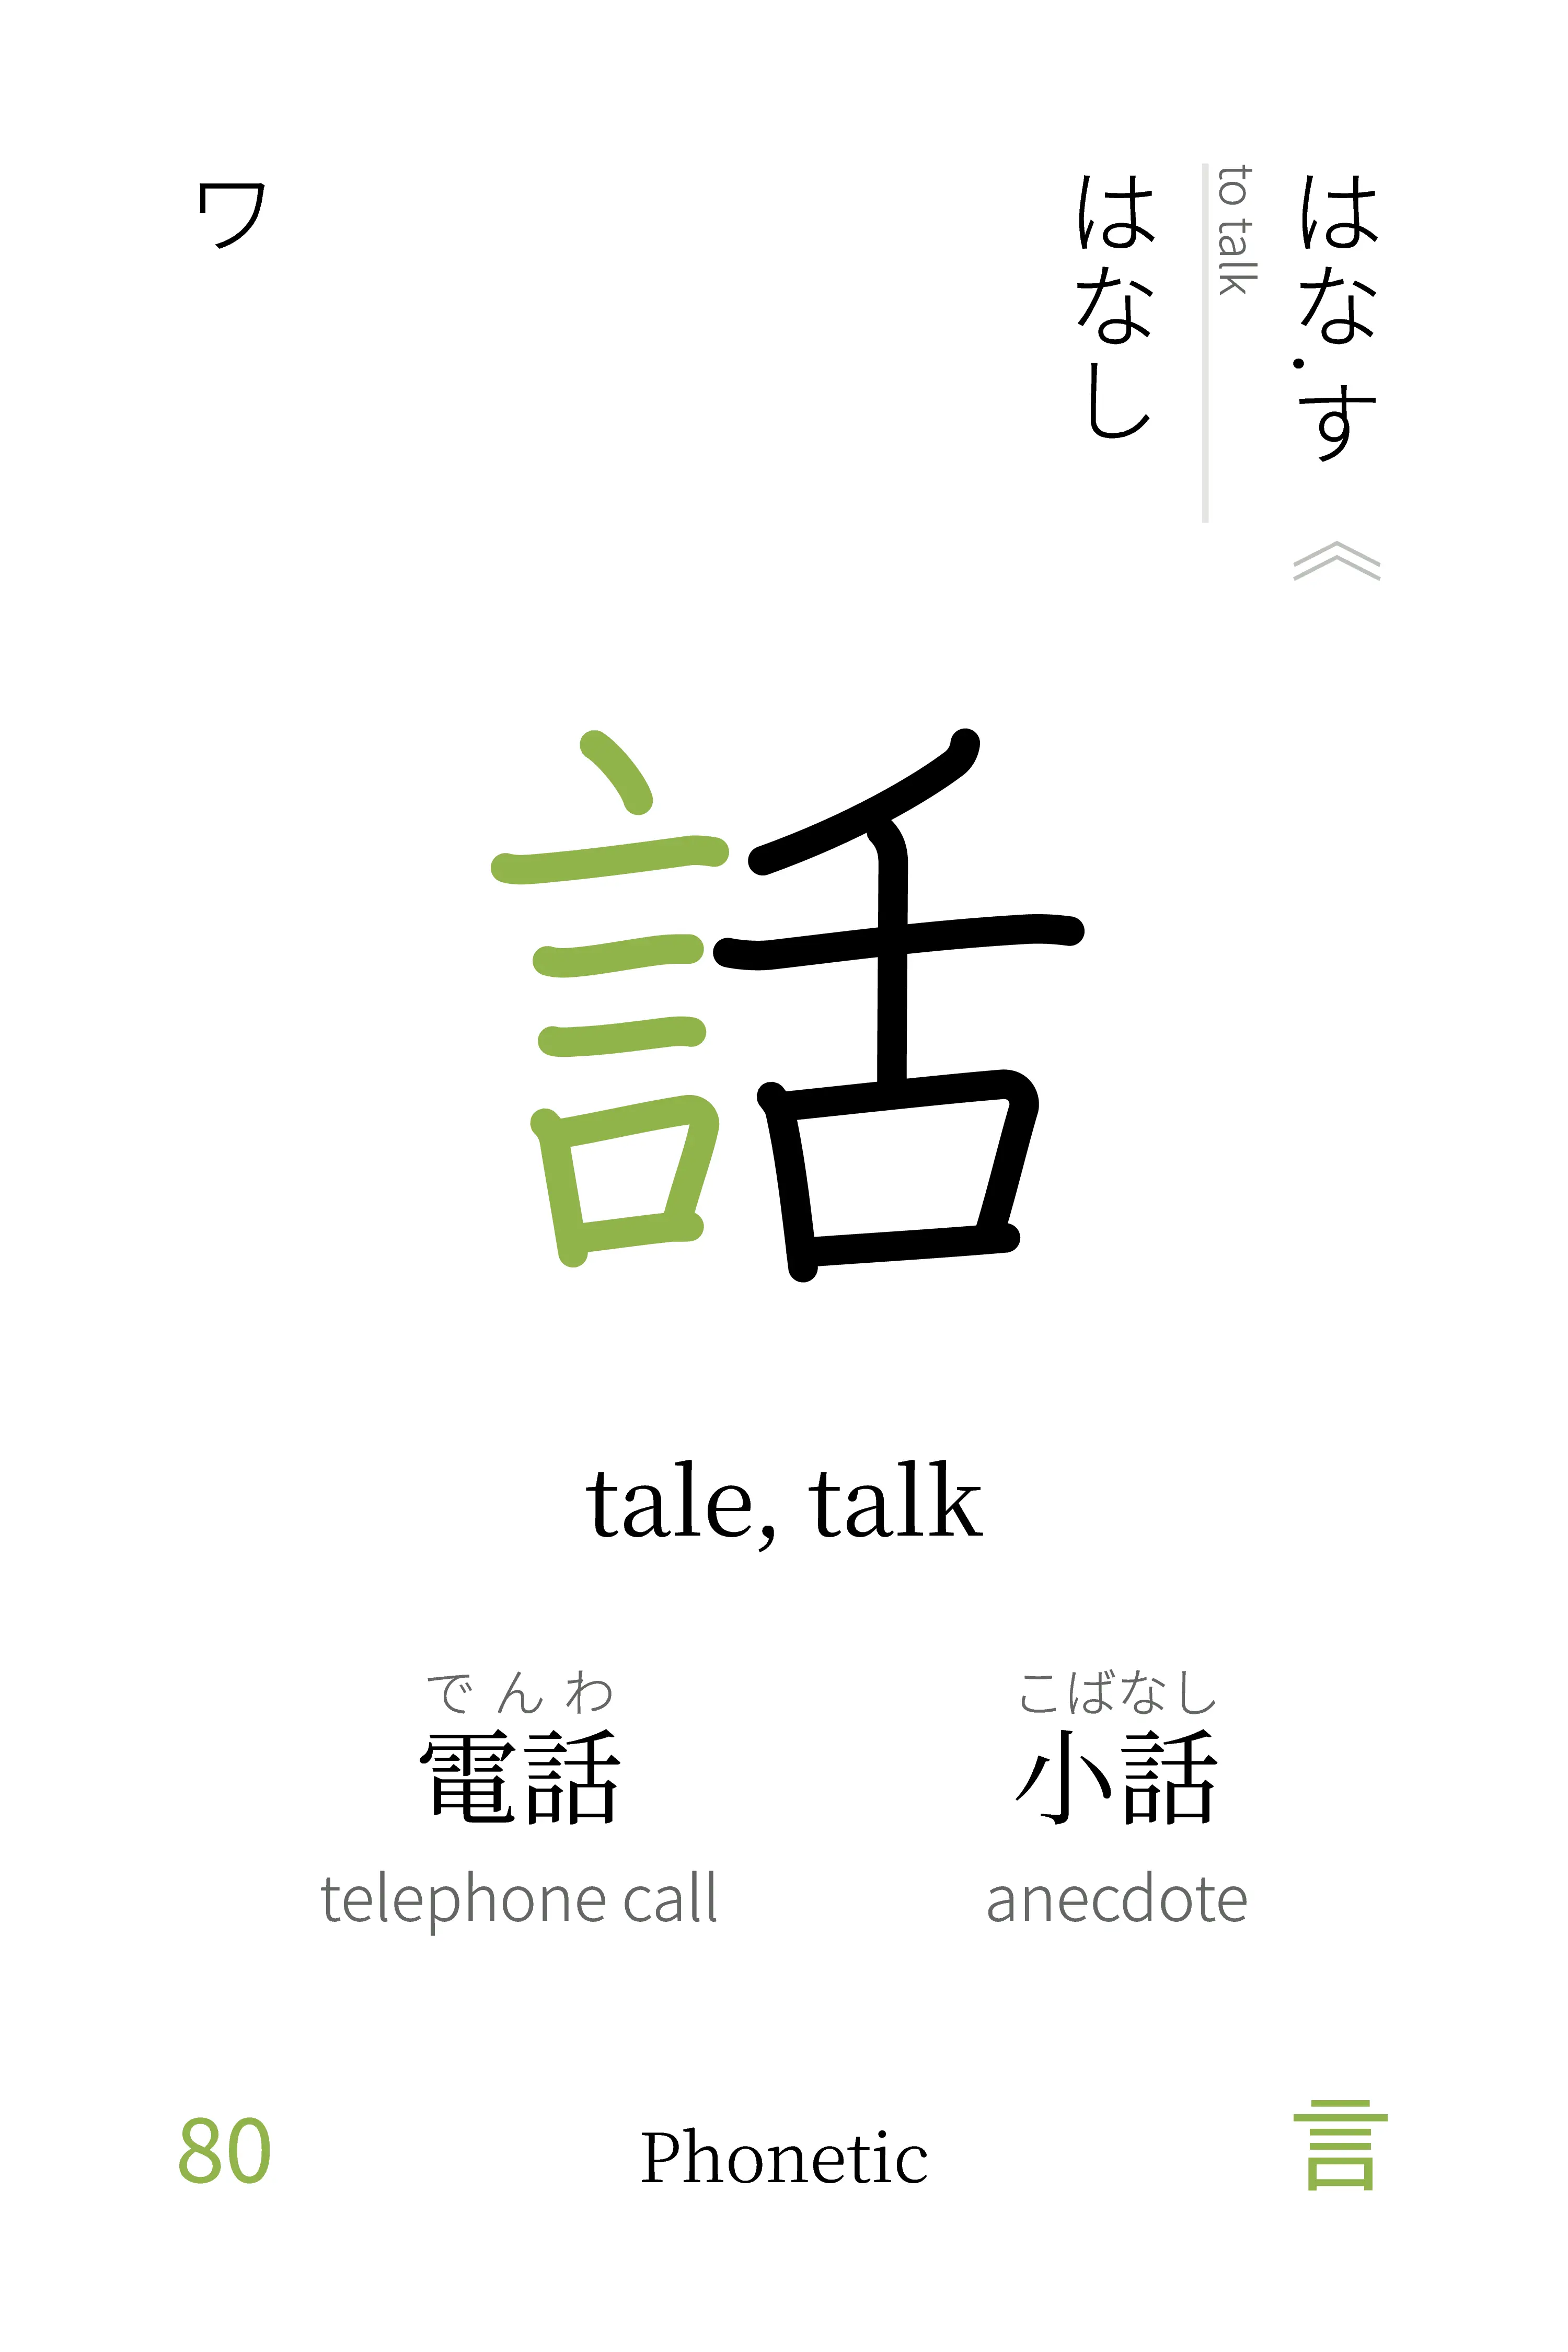
The centerpiece of every card is the Kanji. Below the Kanji you can find its meanings. A kanji can have more than one meaning. Most often, these many meanings will be all related or connected in some way. You don’t need to remember all of them, just the first one is enough – with regular usage and through examples, you’ll eventually develop a more intuitive understanding of the character and need less a concrete list of meanings in English.
For instance, the kanji 「話」has meanings “tale, talk”.
When a Kanji is used to form a compound word, its meanings contribute to the overall meaning of the word. The word「電話」is formed by the kanji for “electricity” (電) and the one for “talk” (話), and it means “telephone call”.
A Kanji can also appear simply on its own or with so-called okurigana (trailing hiragana characters) to form nouns, verbs, adjectives, etc. For instance, 「話す」, the 「話」kanji with the trailing「す」hiragana character, is the verb “to talk”.
Secondly, a Kanji has multiple readings, which are split into two categories:
- Kun’yomi readings – original Japanese readings, typically used when the Kanji appears standalone (only suffixed by hiragana) – are presented in hiragana in the top right corner.
- On’yomi readings – adapted from the Chinese readings associated with each character, typically used when the Kanji appears next to other Kanji in compound words – are presented in katakana in the top left corner.
When first learning Kanji, it suffices to learn only one reading for the character – ideally the most common reading – which we mark with 《. The reasoning is it’s not all that useful to memorise all readings straight away, and the less common ones can be more easily learned when you’re more familiar with the character and see it used in new words or contexts. Of course, if you like any of the other readings, do learn them as well/instead. If you’re curious about the difference between these two types of readings, see On’yomi and Kun’yomi in Kanji: What’s the Difference?.
For example, the character「話」has an on’yomi reading「ワ」, and kun’yomi readings「はなし」and「はな.す」.
The Kun’yomi readings on the top-right sometimes have a dot (.) and a meaning written sideways right next to it. The dot (.) indicates where the Kanji reading ends and where the okurigana (trailing hiragana characters) begin.
For example, the Kanji 「話」 has a reading 「はな.す」, which means that, in real-world Japanese, you’ll find the kanji「話」is read as 「はな」when paired with the hiragana「す」– that is, 話す!
When the kanji is used with okurigana, it forms a word, typically a verb or adjective. When there is an English phrase written sideways, next to the kun’yomi readings that have okurigana, it stands for the meaning of the word formed by that kanji with that okurigana specifically.
For instance, 「はな.す」will appear in the kun’yomi readings of「話」and will have written “to talk” sideways next to it, since 話す is the verb to talk!
The fun thing about adjectives and verbs is that they can be conjugated according to a couple of simple rules to easily extend or twist their meanings – always following the same pattern. Learning kun’yomi readings with okurigana allows one to get a lot more mileage from a single kanji by being able to use, and conjugate it, immediately.
We encourage students to read these out loud and practice conjugating verbs and adjectives. At any time, they should consult the conjugation cheatsheet card to recall how to do so.
The two examples, appearing below the meanings, are examples of compound words that can be formed with this Kanji. Above each example is given the reading in hiragana, and, below, their meaning. The examples are picked according to two criteria:
Try to pick only examples which combine this kanji with ones you’ve already learned (hence the number on the bottom left!!).
Next, choose the most frequently occurring words out of the examples picked according to the first criteria. If none exist, just pick by frequency from all words using that Kanji.
For instance, the word「電話」(“telephone call”) is shown as an example for the kanji「話」.
Similarly to the kun’yomi readings with okurigana, we encourage you to practice reading the examples out loud.
Depending on your level, it’s a great exercise to try and form sentences with words you learn from a kanji card.
On the bottom left corner, there is a sequence number to order the cards. The order is not random! According to the order, within the same level, a kanji character will only occur after its components, and simpler characters appear before more complex ones. For instance, 雨 is the top component of 電, so 雨 appears before 電 when learning the cards in order.
On the bottom right corner is displayed the Kangxi radical of the character. You may also notice that the same radical is highlighted in color in the kanji in the center. For Kanjideck, the radical’s main goal is to help with distinguishing different components of the same character. In most cases, the radical will also hint at the meaning of the character.
For instance, the radical of 話 (talk, tale) is 言 (say, word).
Highlighting the radical really helps in breaking up the character visually into its different components. In turn, this makes it much easier to learn new kanji since complex ones, which were maybe seen as impossible to decipher, are now seen as simple compositions of other characters you already know.
Note: some radicals can be used in short form, such as 亻 standing for 人. In the bottom right, the long form, eg. 人 will be used. Naturally, in the kanji, the short form is kept if used.
Finally, on the bottom at the center, there is an etymological classification. This etymology is a hint to help students more easily grasp new characters, by highlighting principles underlying how characters are formed in Japanese and Chinese according to the most widely used Chinese/Japanese etymology classification system (do follow this link for more in-depth details!).
Recall that the great majority of Japanese characters are imported or adapted from Chinese – that’s why the etymology essentially applies to both languages. While most Japanese characters share etymology with their Chinese origin, there exist some Kanji that original from Japan. These are called Kokuji.
All in all, there are 6 main classifications for Kanji characters:
Pictographic, characters whose origin is a representational drawing, e.g. 山 is a pictogram of a mountain and means mountain.
Ideographic, characters whose origin is a depiction of an idea graphically, e.g. 上, a line point upwards from another line represents the idea of “above”, and, in contrast, 下 depicts “below”.
Compound Ideographic, characters that are formed by combining other characters and their meanings, e.g. 学 combines a child 子 under a roof 冖 to mean “studying” or “learning”.
Phonetic, characters which are also formed by combining other characters, but where their parts are separated into semantic and phonetic components – the semantic component contributes to the meaning, and the phonetic component contributes towards the reading.
An example of a phonetic character is 語 which means “word” or “language” and its on’yomi reading is ご. Its semantic component is 言 (“say”), and its phonetic component is 吾, which is also read ご (but has an unrelated meaning)! Further, 吾 is also a phonetic component, comprised of semantic 口 and phonetic 五 (“five”), which also read ご!
Loans, characters which were adopted to write other words with similar pronunciations.
Original, characters that are original from Japan rather than being adapted or imported from China. They are also known as Kokuji.
Note that not all sources agree with the classification of every single Kanji. As the study of etymology progresses, certain Kanji are perceived or understood under a new light that causes their etymology to be revised. A Kanji may also fall under more than one classification, for instance, if a phonetic component also contributes to the meaning it may be classified both as Phonetic and Com. Ideographic.
In Kanjideck, the etymological classification should feel like a hint. It may confirm your suspicions regarding the origin of a character, or cause you to think about the separate components of the character to try and figure out how they together form that meaning.
Whenever you are curious about the origin of the character, on the Anki digital deck, you can follow a link to the corresponding Wiktionary page by clicking the classification. There is often a description of the character’s origin under the Chinese section. Additionally, the wiktionary page often has images of the character’s evolution across time. It’s interesting to watch how pictographic characters evolved, as earlier versions resemble more closely the thing they represent. The source for the etymological classifications of Kanjideck is a dataset of Jouyou Kanji published by Oxford University, via kanjidatabase.
Reviewing and the spaced-repetition schedule
Kanjideck endorses using a spaced-repetition system to learn Kanji because it helps manage the sheer amount of characters one must learn by spacing out reviews over time while improving your recall.
Spaced-repetition is an old yet very powerful idea that is heavily used worldwide to study disciplines that require some degree of memorisation, notably medicine (example) and language learning (for vocabulary, alphabets and syllabaries, etc…).
All Kanjidecks include 6 cards to serve as markers in a physical spaced repetition system. Each of these cards has a level and an interval. For instance, the card for level 3 says:
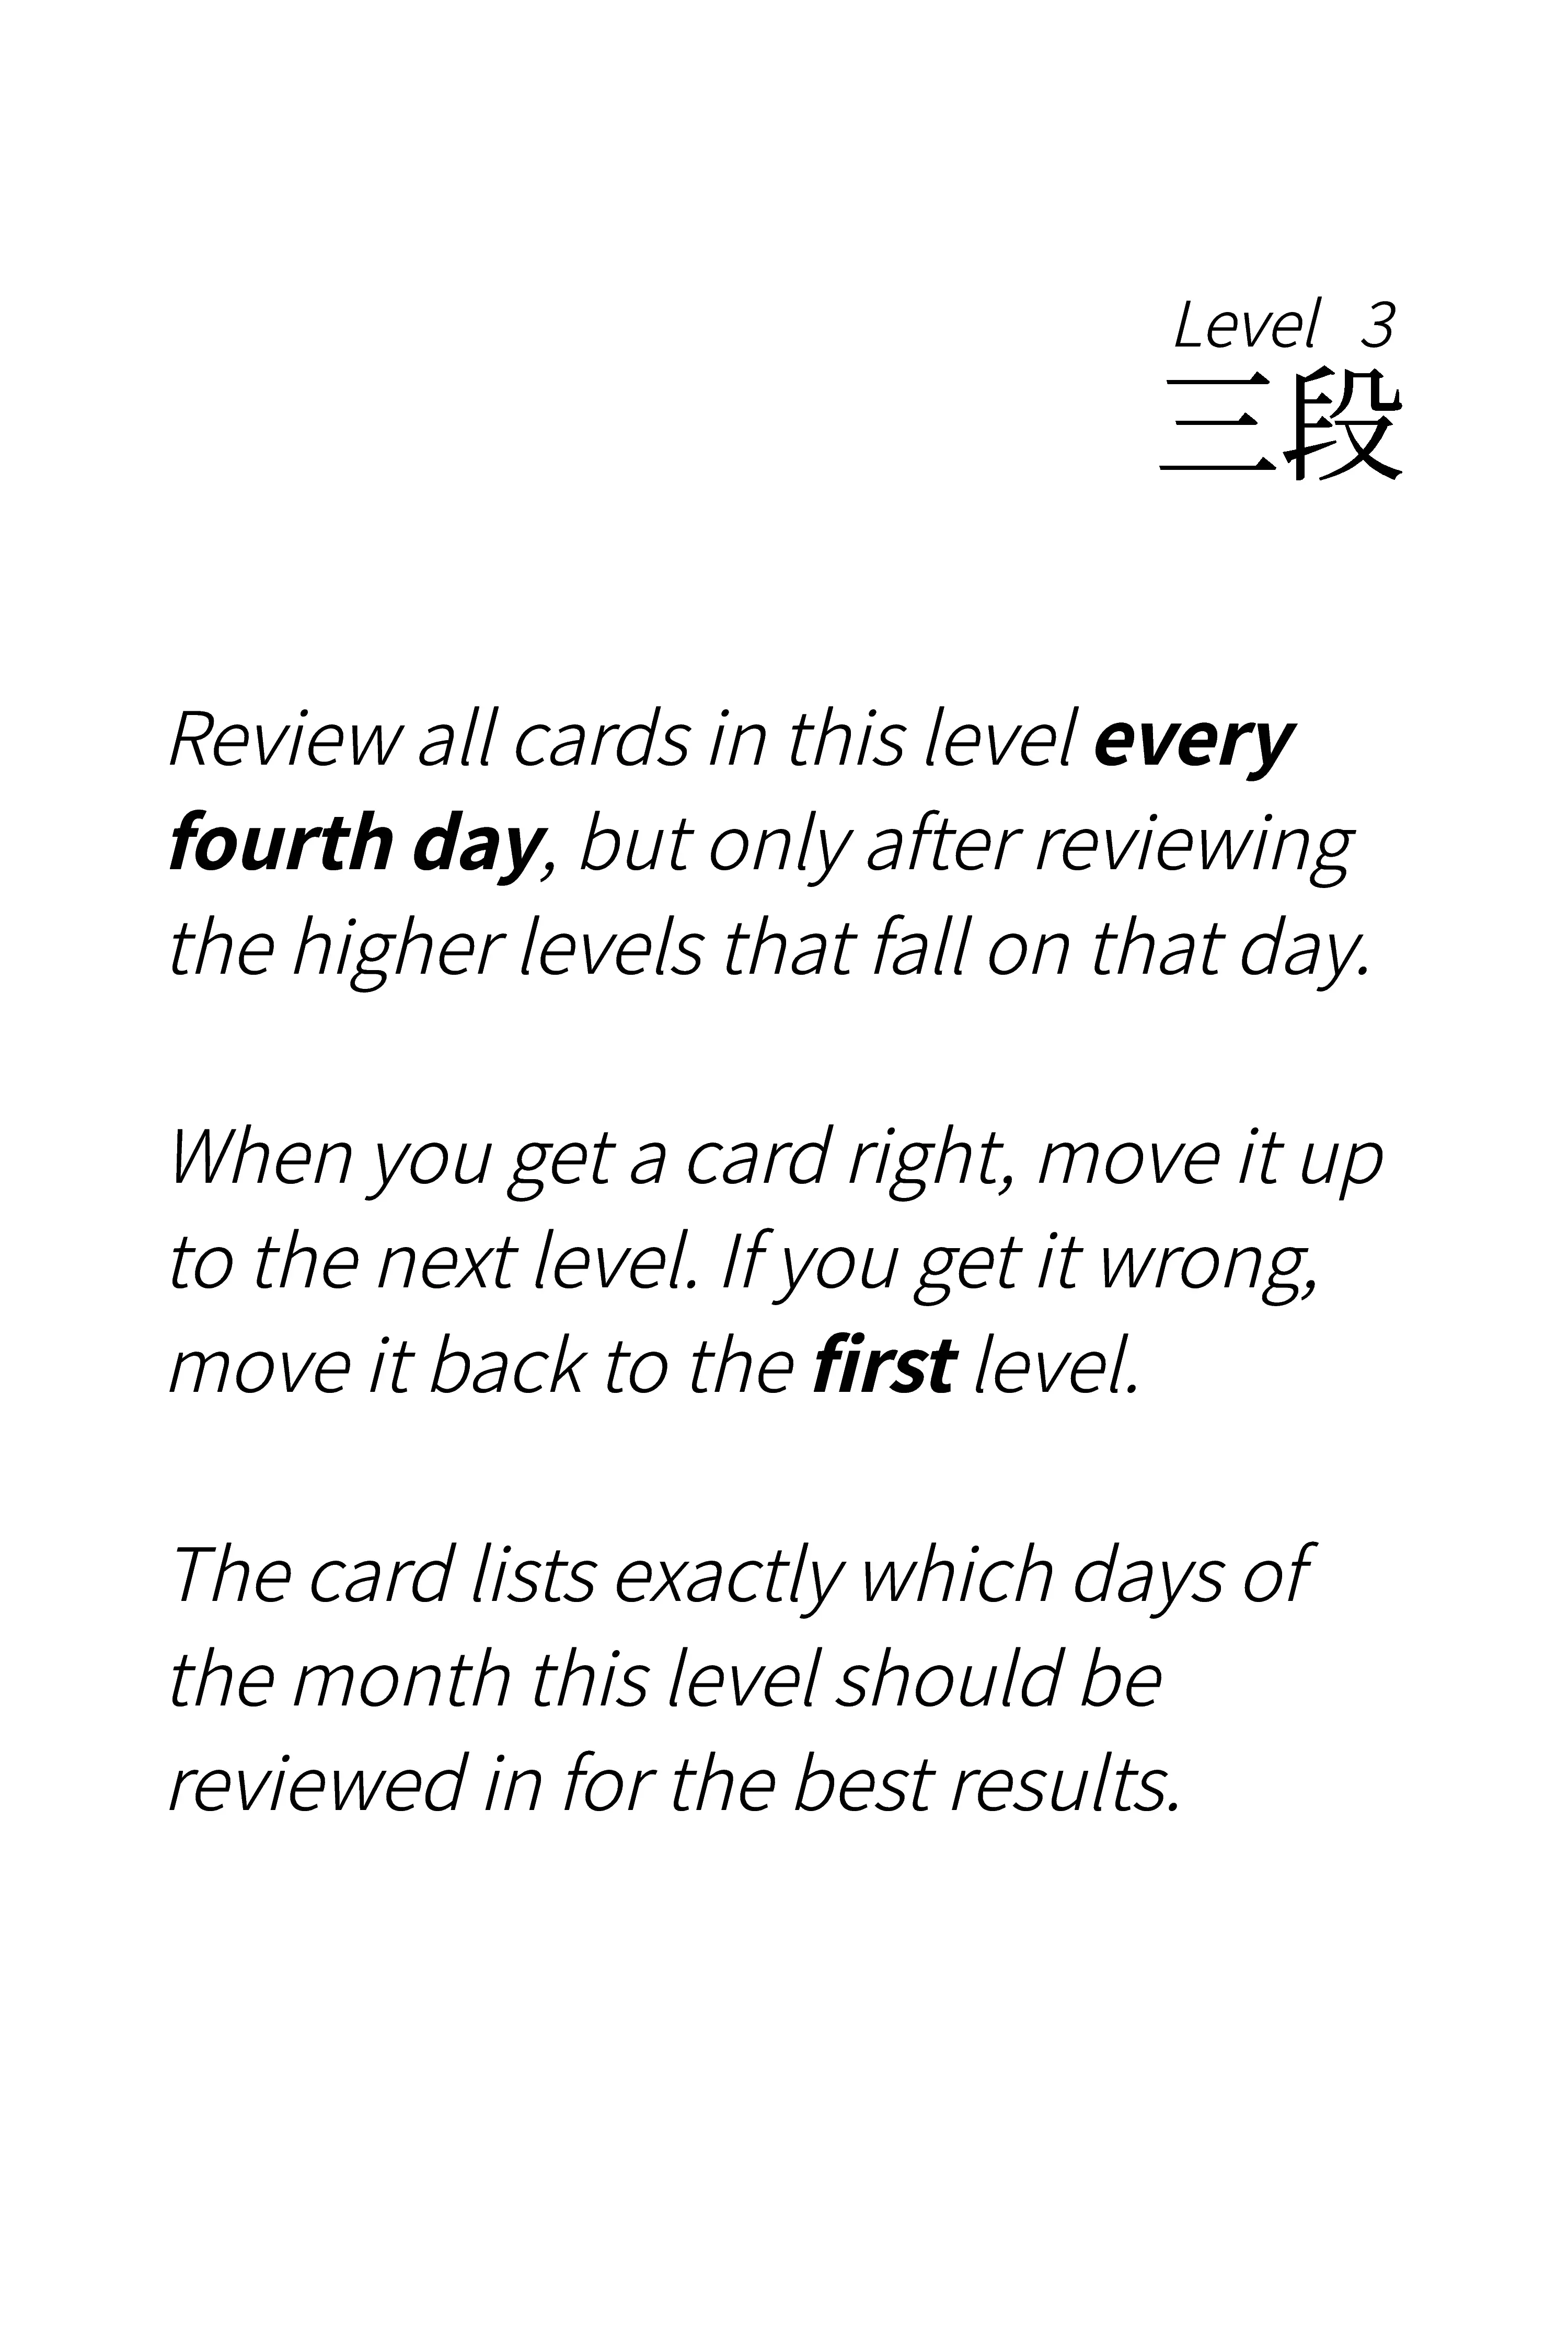
On its front, the interval is the main object of focus:
All new cards start in level 1. Every time you learn or review a card in level 1, you move it to the next level if successful. When you successfully review a card in level 2, move it to level 3, and so on. A successful review always means the card moves to the next level.
On the other hand, a failed review causes the card to be moved to level 1, always! If you fail a card review on level 4, move it to level 1. Same for all other levels.
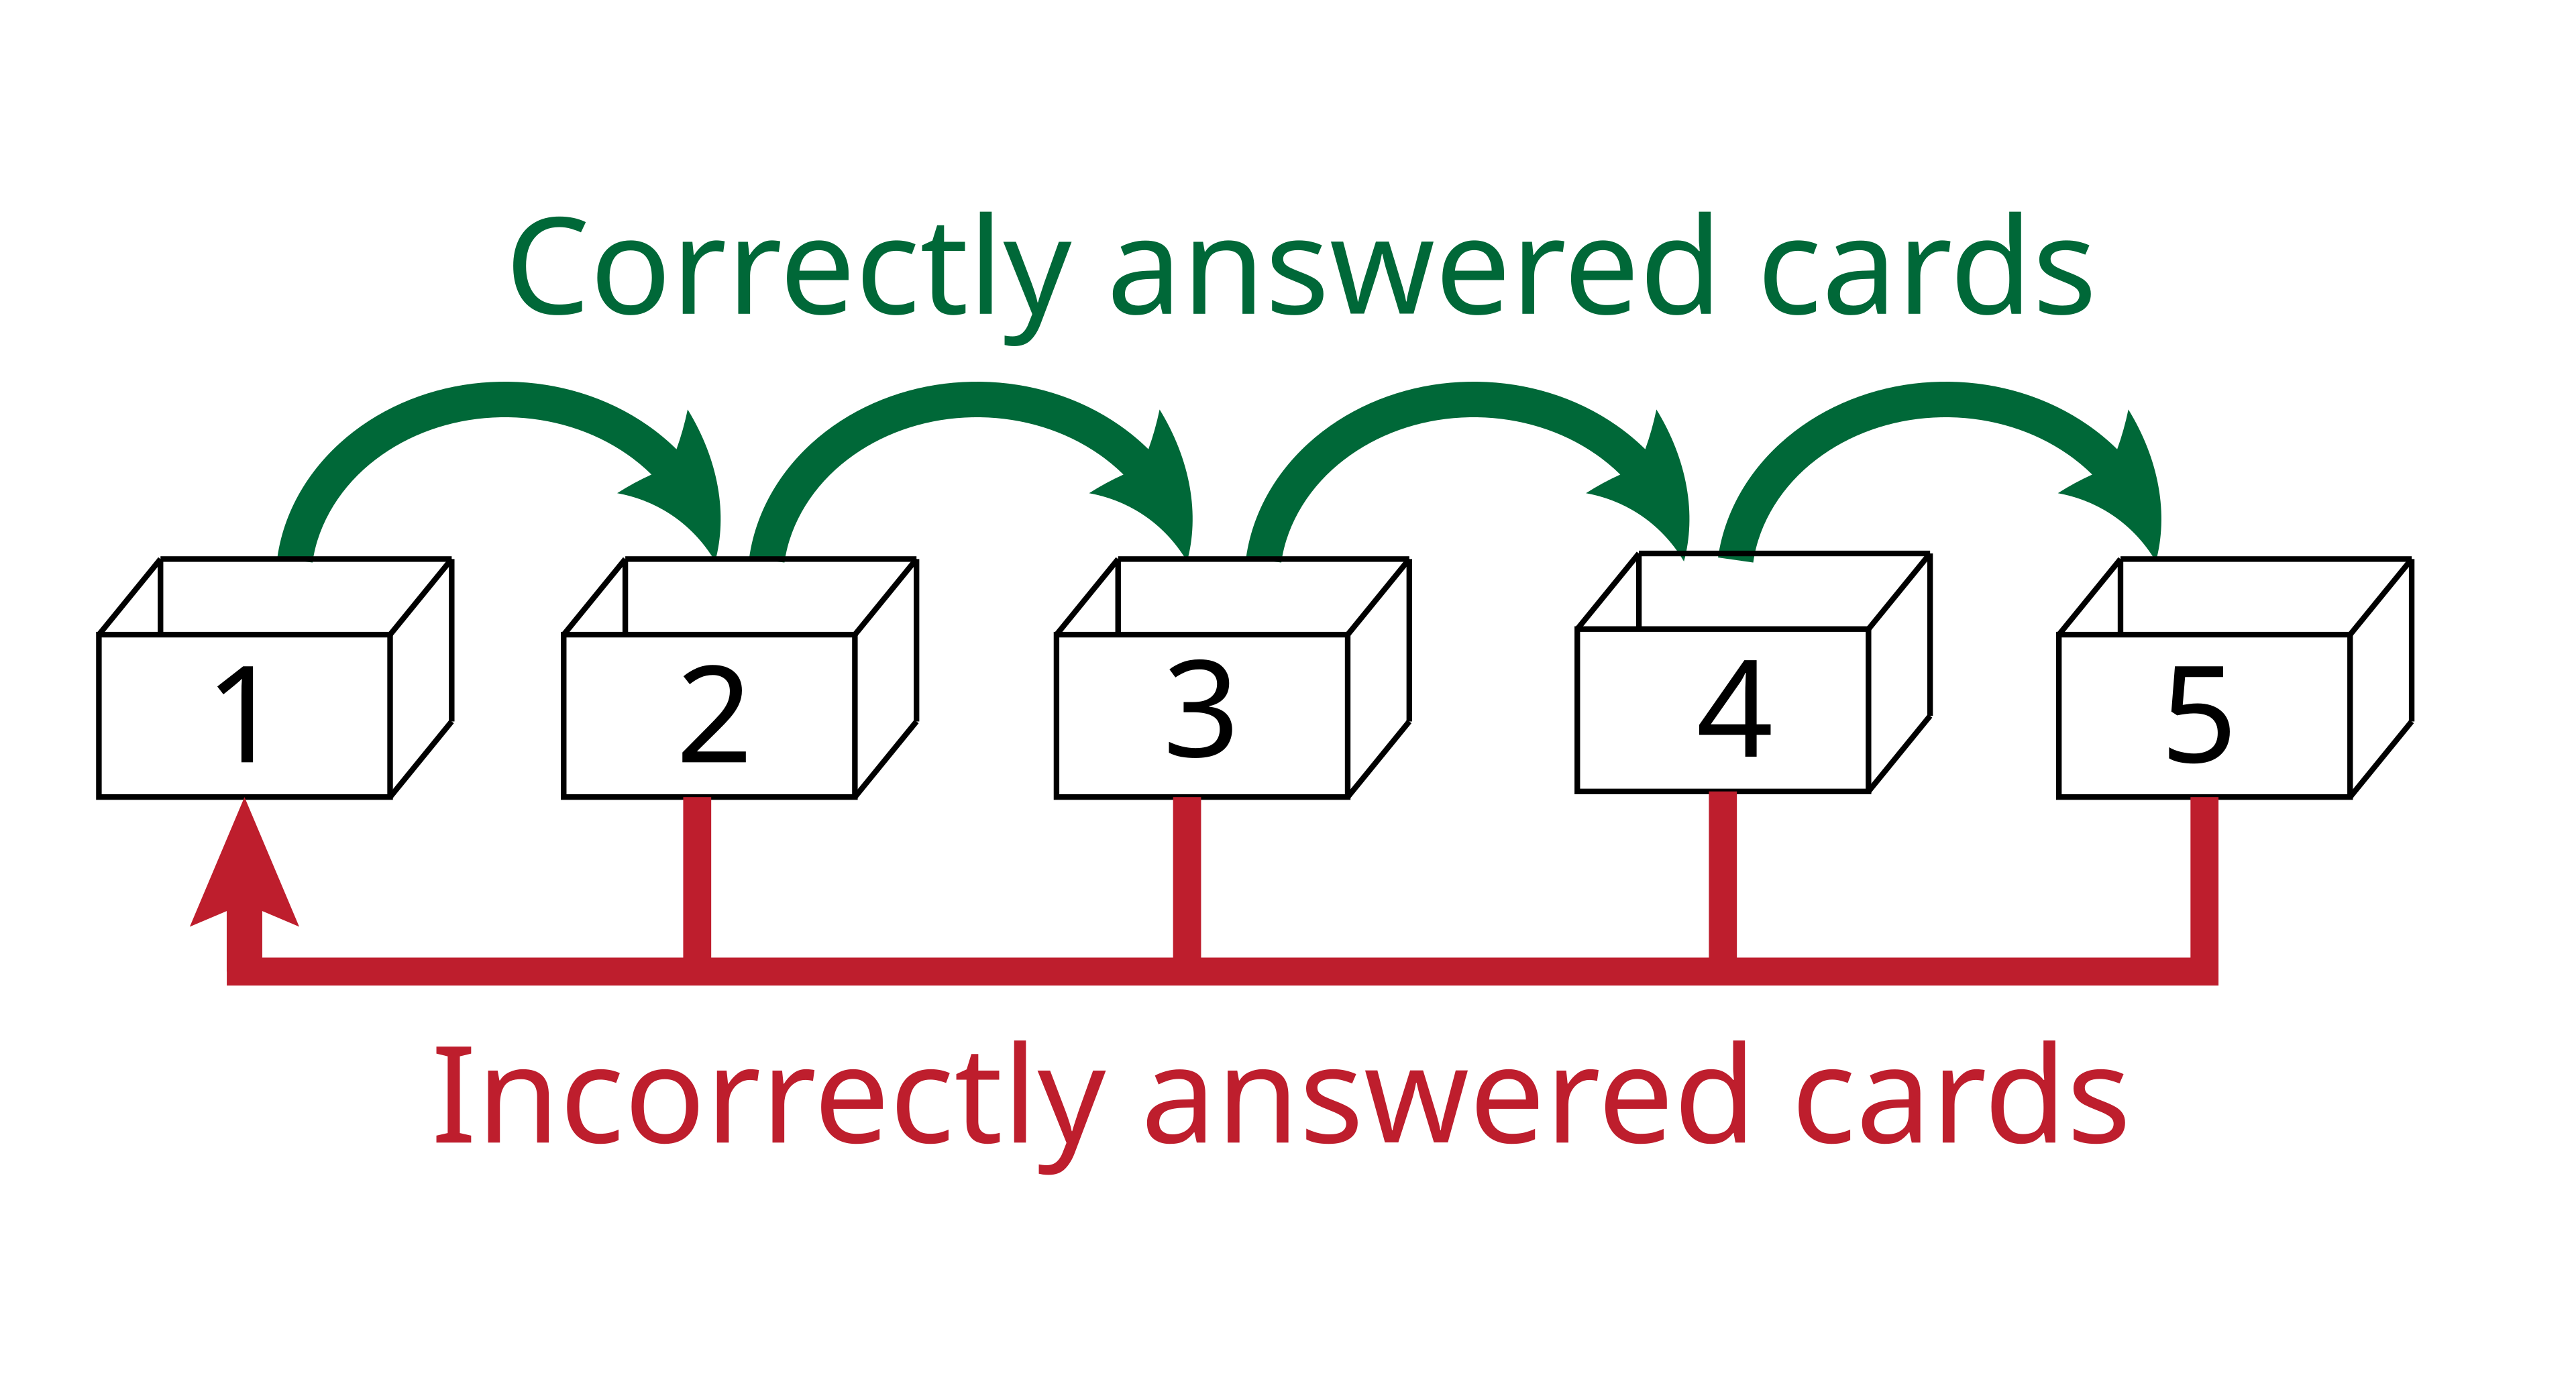
To keep track of levels, one should start a study session by laying out the 6 level cards on a table, forming a pile with the cards in each level. After studying, store the cards in a way where each level marker separates the cards in that level from the cards in the other levels, such that it’s possible to reconstruct the state of this session in the next session.
Studying every day
On your first day, there will be no cards to review.
Get started by picking up the first 3 or 4 cards from the deck in order (starting with card nº1), and looking at the colored side.
Flip each card around, and study it (according to the previous section about studying).
Place it face down on top of the level 1 pile.
After going through all of your new cards for the first time, review them again by picking them up from the level 1 pile. All the Kanji which you recall correctly, move to level 2.
On the next day, intervals come into play. Lay out the level cards on the table, with the cards from the previous day on top of level 2 (remember to use the level cards as separators when storing the deck!), and with all other new cards to the side. Then:
Go through 3 or 4 new cards and place them on the level 1 pile after studying them.
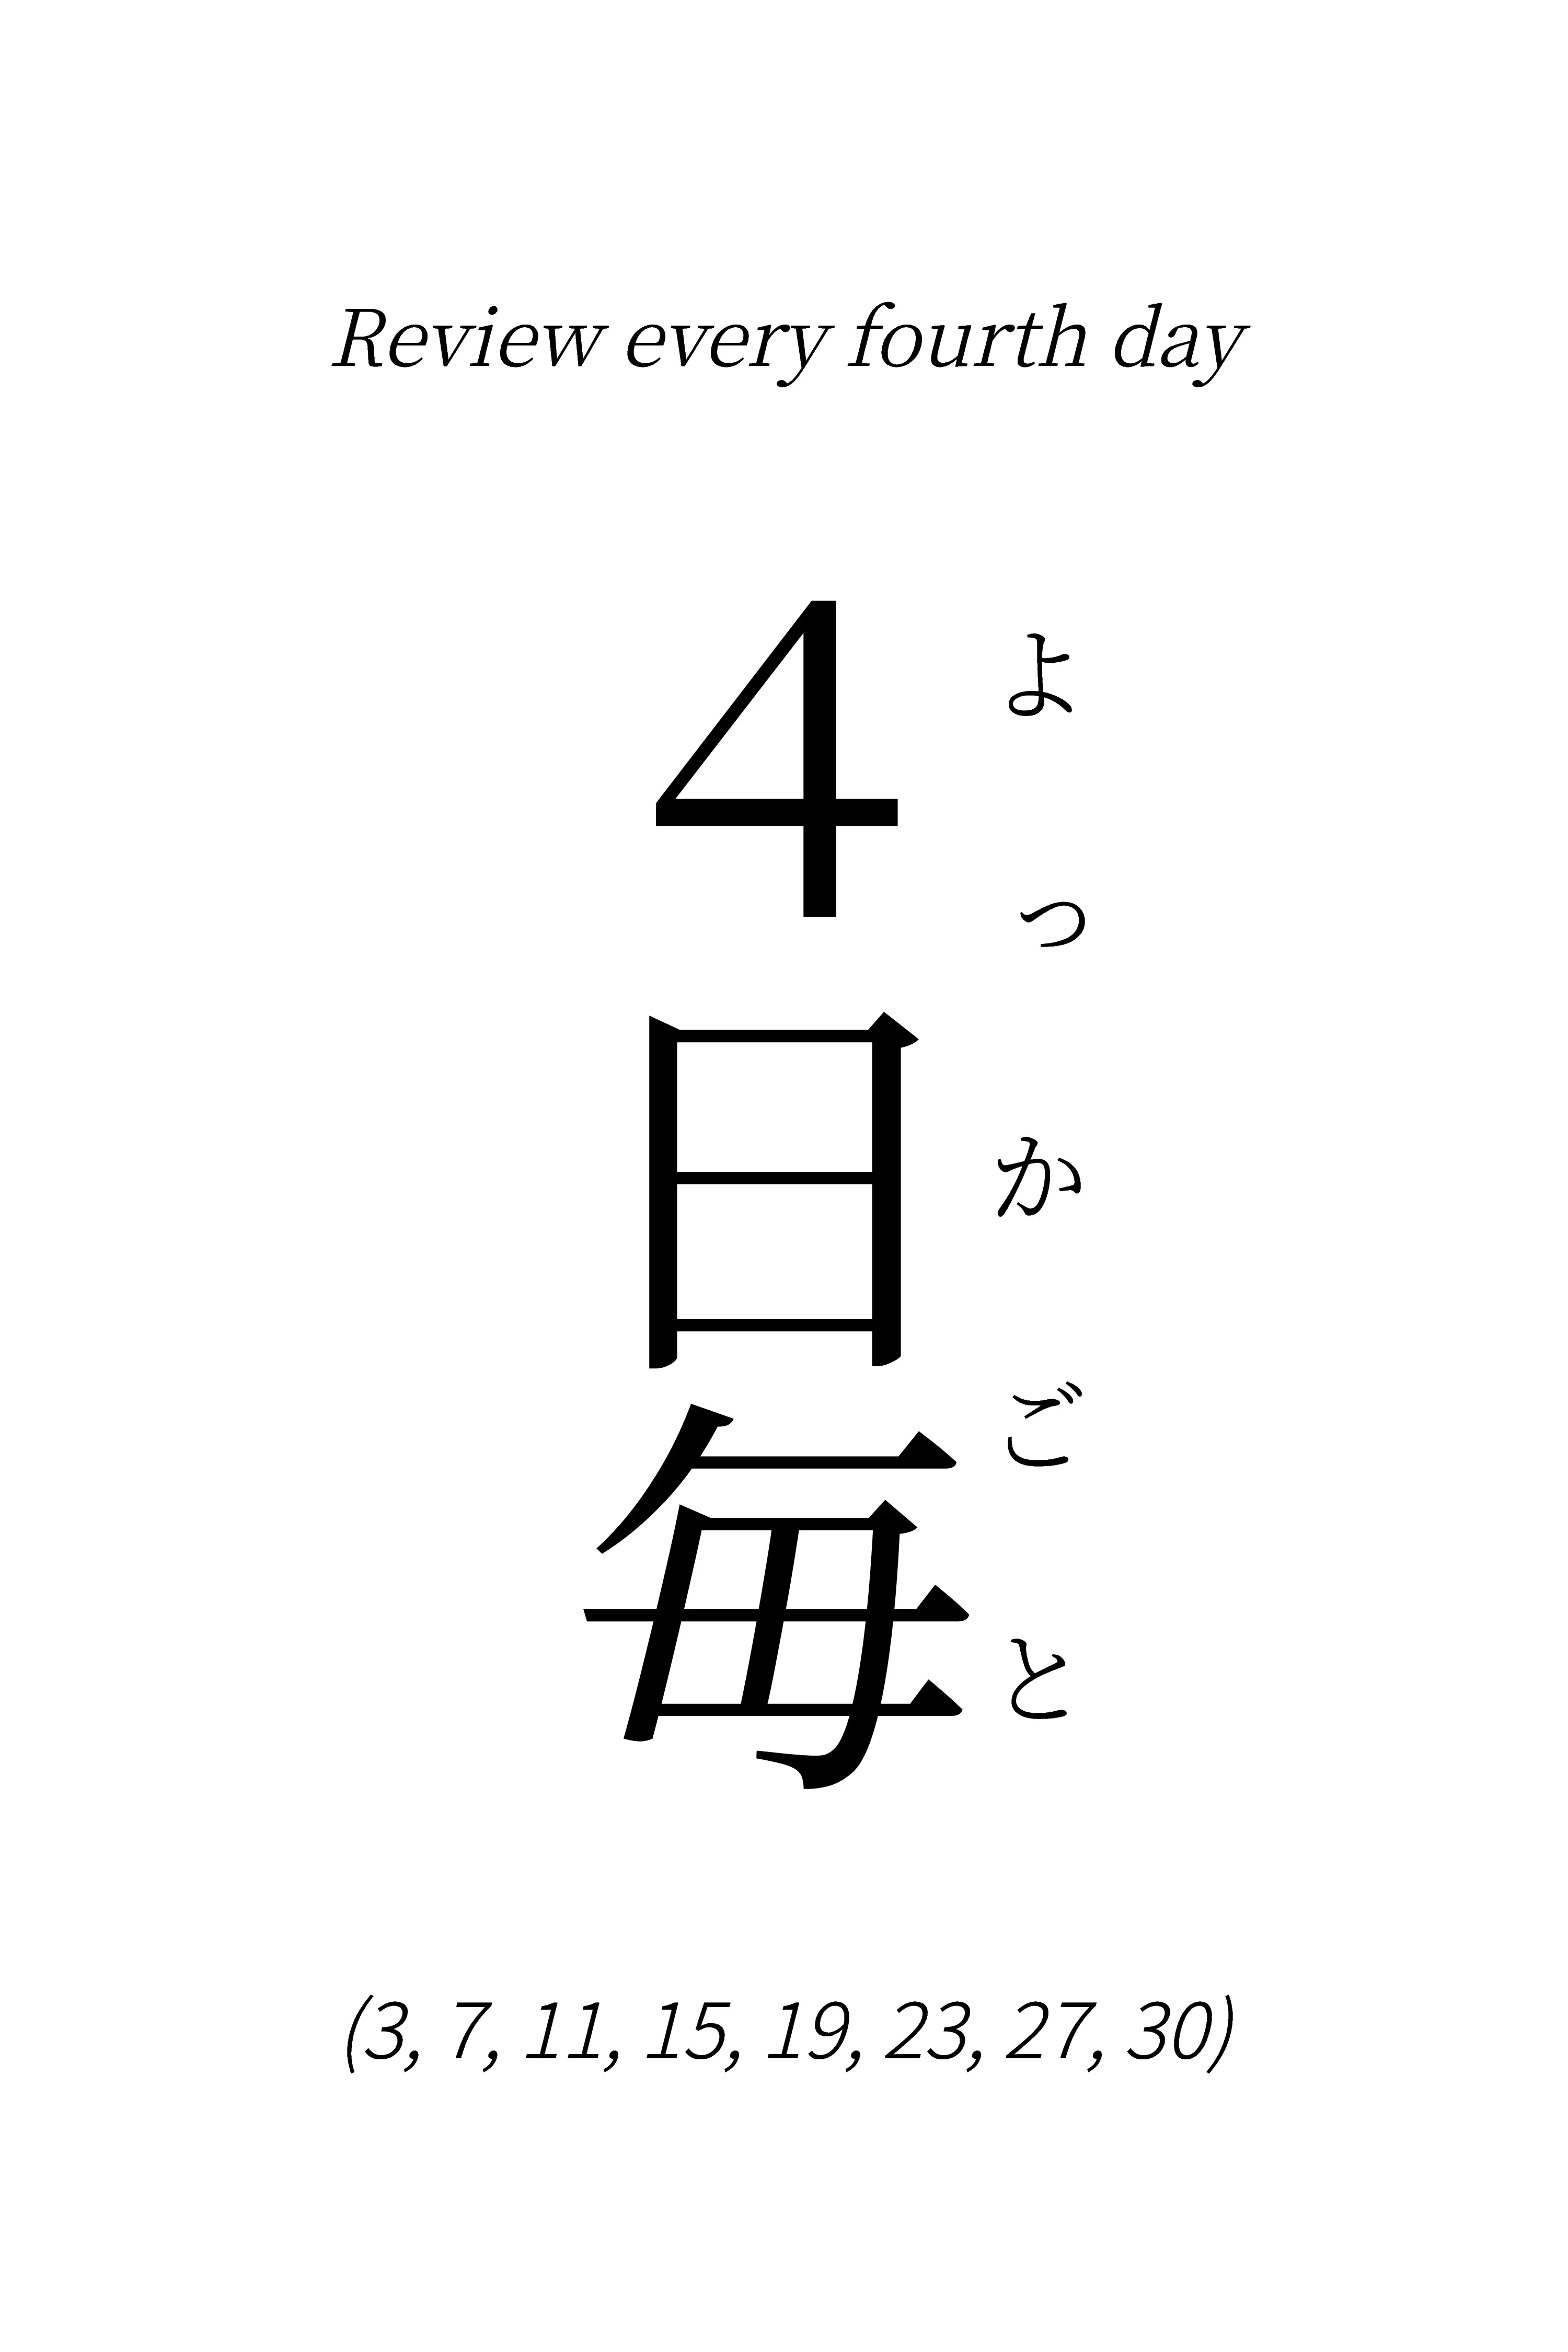
Now, starting from the highest level, review the cards in each level that is scheduled for that day. A key concept of spaced repetition is that you shouldn’t study all cards every day – the review should be spaced out. To control spacing, each level card has an tentative interval at which the cards in it should be studied. Additionally, each level lists the days of the month in which cards in that level should be studied (e.g. level 3 should be studied every 4 days: on the 3rd, 7th, 11th, 15th, 19th, 23th, 27th, 30th of the month).
Since in our example only level 2 has any cards, let’s go through it:
Kanji cards in level 2 should be studied every two days. Since yesterday we studied them, we should only study them tomorrow.
We don’t keep track of the intervals manually. Note how each level card is annotated with the days of the month in which it should be reviewed. For level 2, it’s every other day of the month. If today is listed in level 2’s days, review the cards in level 2 today.
Unfortunately, the days and intervals listed in the physical cards are an approximation of what would really be the optimal interval at which each card would be studied. This is a natural limitation of using a physical spaced-repetition system as opposed to a virtual one: digitally, each card can be scheduled optimally by the computer. That said, the origins of spaced repetition are physical (See Leitner box), and its benefits are nonetheless very much present.
If the level 2 cards were scheduled for today, we review each card normally: successful reviewed cards move to level 3, failed ones move back to level 1.
After reviewing level 2, start reviewing level 1. This will include all the cards which fell from level 2 back to 1, and the new cards you’ve introduced today. In the end of a successful study session, the level 1 pile should always be empty.
In general, the reviews are always done from the highest level to the lowest level because of this: all the cards failed in the higher levels will fall down to level 1, and then be reviewed once more.
On the third day, you do the same thing, this time starting with level 3. As cards progress through the levels, you’ll have more levels to check, but you will not have to review all of them every day. Cards in level 5 will only be reviewed twice a month. Cards in level 4, four times a month, and so on.
When a card is in the last level, you may want to keep it around for some more time and continue reviewing it at large intervals. Eventually cards you now know really well can be “retired”. Alternatively, you may create your own interval markers (say, level 7 at every 2 months, level 8 at every 4 months, …).
For maximum efficiency, it is strongly recommended you do one short study session every single day. Review the cards scheduled for that day, and learn a couple of new ones. If you fail one day, the next day you must review the cards you skipped on the previous one.
The virtual deck
The virtual kanjideck is available for the open source spaced repetition software Anki. While we believe a physical deck of Kanji is best to get started, handling one with the 2136 Jouyou Kanji required for Japanese fluency would become unwieldy.
That’s why every physical kanjideck provides access to the virtual kanjideck: when all cards from your physical deck have moved to level 6 or retired, you should pick up the virtual deck to continue your Japanese kanji study! Using the virtual deck will allow you to learn many many more Japanese kanji, and it will keep track of the optimal intervals at which you should study every Kanji to memorise them forever.
The Anki software is open source and freely available for almost all platforms (including Windows, macOS, Android and Linux). The exception is, unfortunately, iOS, for which the official application requires a one-time purchase on the App Store. It is also available on all browsers via AnkiWeb. Alternative Anki clients in the App Store and Android store may also be supported.
If you use a different spaced repetition software and would like a port of Kanjideck there, do get in contact with me to see what is possible to arrange.
Reference cards
There are 4 reference cards included in Kanjideck.
1 introduction card with a quick guide on how to use the deck and identifying the various components of the deck
1 reference card for hiragana and 1 for katakana. As mentioned in the guide, both these phonetic scripts are used to spell out the Kanji readings, but they are surprisingly simple to learn (see Learn Hiragana, most time estimates for learning Hiragana and Katakana vary from one day to a week…!).
These two cards simply map every phonetic symbol to its sound. Feel free to consult them whenever in doubt about a sound!
1 reference card for conjugating verbs and adjectives. This is perhaps the most interesting reference card because it will allow you to get much more mileage out of every verb or adjective formed by a Kanji you learn.
Conjugations allow, for instance, to turn a verb or an adjective into its negative form, or an adjective into its past form. Or a verb into polite form, or into polite-past form.
The conjugations reference card should be used regularly to practice, in their many forms, verbs and adjectives you learn in new Kanji cards!
Conjugations
The reference card for conjugations is split into four sections:
- い-adjectives
- う-verbs
- る-verbs
- ます auxiliary verb
This is not an extensive list of Japanese constructs and conjugations, but they attempt to be the most useful possible while avoiding too much complexity. You can see it as an instance of the 80/20 rule.
Note: be sure to have read the section about the annotated kun’yomi readings in the above section of the guide to learn how to spot readings with okurigana in the cards.
い-adjectives are the easiest to explain: an adjective whose reading ends with い as okurigana is an い-adjective. These are easy to conjugate by swapping the い, for instance, with くない, to negate the adjective. For example, 小さい (small) can be conjugated as 小さくない (not small).
う-verbs, also known as Godan verbs, are conjugated by swapping a terminating う sound, such as む, or く, for one of the other vowel sounds. For instance, 聞く (to hear) can be conjugated as 聞きます to mean “to hear” but in a polite form. Note how the く sound changed to き sound (う to い) and ます was added at the end.
る-verbs, also known as Ichidan verbs, are verbs always terminated by る. Yes, unfortunately, Godan verbs may also terminate with る (since it is an う sound), so there is sometimes a bit of ambiguity with verbs terminating in る (is it Ichidan or Godan?).
A good rule of thumb is to consider verbs terminated by [え]る and [い]る sounds as Ichidan, and the remaining vowels + る, like [あ]る, to be Godan (for example, 分かる is a Godan verb).
If you’re curious, here’s a link to read more about the distinction between Godan and Ichidan verbs.
Ichidan verbs are typically conjugated by dropping the る for something else. For instance, 食べる (to eat) becomes 食べます in its polite form, so る was swapped for ます.
The ます auxiliary verb is a verb which gets attached to verbs conjugated on the polite form. We saw two examples above which used this auxiliary verb, with the 聞きます and 食べます conjugations. Interestingly, the auxiliary verb can be further conjugated, say, to construct the polite negative form of a verb. We’ve included this auxiliary verb in a separate section because it has highly irregular inflections, and because it is crucial in further conjugating the polite form of a verb.
For example, ます becomes ません in its negative form. Therefore, to conjugate 聞く to its negative polite form, you’d first conjugate it to polite form (聞きます), and then conjugate the auxiliary verb to get 聞きません (to not hear, polite form).
The reference card itself compactly explains how to conjugate each type of verb and adjective in many ways. We believe that by utilizing conjugations you can leverage every learnt word to a higher degree and get better at Japanese. Do refer to it when learning new verbs or adjectives to practice them while reaching further!
Conclusion
We hope this guide allows you to make the most out of the Kanjideck cards. If you have any questions, feel free to contact us!